Open a new project by clicking on Open a new project, follow
the steps as shown in the below
Click on start a new Android Studio Project
Enter whatever name you want to name your project, Make your Project name start with an Uppercase e.g. BookApp, TextApp etc.
Then click on
Next
Just click on Next
Make sure you pick the Empty Activity for the purpose of
this tutorial and click on Next.
Just click on Finish and wait for a while the gradle builds
and your environment is ready for you to use.
For some people that don’t have internet access, you’ll need
to work offline. In order to do so, go to project > Android > Gradle Scripts >
build.gradle (Module:app)
Note: There are two build.gradle files, build.gradle
(Project:Language) and build.gradle(Module:app), you should select the second
build.gradle.
Then you’ll delete some lines of code in the build.gradle,
the highlighted lines only. When you are done, you will click on Try Again at
the top right side, as it is indicated below. You’ll wait while it finishing
building.
Understanding your
environment, Android Studio
I will explain some terminologies to you so that you will
familiarize yourself with Android Studio. I know many of the names will be
strange to you (if you are new to Android Studio and programming). I will
explain the basic ones and as we progress, I will explain more.

- AndroidManifest.xml is responsible for many
things including the first activity that will be launched. To pick the activity
that would be launched first, you need to go to AndroidManifest.xml. Your App
Icon is set in AndroidManifest.xml. I will say AndroidManifest.xml determines
how your codes will run on your phone. Any Activity you open and is not listed
in the AndroidManifest.xml will not be accessible when you run your App on a
mobile phone.
- Java (e.g Details and MainActivity) is the
java file where you will be writing all your java codes. If you open another
java class, it will display here. As you can see, there are only two java
classes.
- res folder is the folder where all your resource
files are located and stored. Resources like layout, images, strings, color
etc. are stored under the resource folder directory.
- drawable is the folder responsible for storing
images that you want to you in your project. When you want to use an image in
your project, you copy the image from PC and paste it the drawable folder.
- layout is where all your activities are stored.
The activities that you interact with when you run App on your device.
- mipmap is where your default Android Icon is
stored.
- colors.xml is where colors are stored.
- strings.xml is where strings are stored. Strings
are literal in Android language. “I want to learning Android Programming” is an
example of String.
- styles.xml is responsible for styling of your
App, the color of your status bar, color of your toolbar, text background
color, the theme of your App.
Running our App on a
physical device like our Android Phone
Tools: An Android Phone and ADB Driver Installer you
downloaded.
On your Android Phone, go to Settings > About phone >
Build number.
Tap on Build number seven times, then a toast message will
appear “You are now a developer”.
Then, press the back button, directly above “About phone”,
you will see “Developer options”
Tap on it, enable it by clicking on the on switch. Scroll
down and enable the USB debugging.
Connect your Android phone to your computer with a
transferrable USB cord/wire.
Launch ADB Driver Installer. Your Android Phone will be
displayed on where I highlighted and you will click on Install
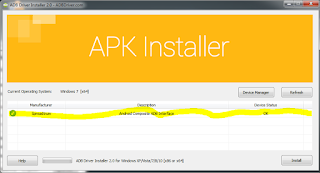
So, when your Android phone is successfully installed, go to
your Android Studio
Click on “Run” on the menu bar, click on “Run app” on the
drop down menu. A box pops up
If your Phone was not successfully installed, it won’t
appear, it will bring “No USB devices or running emulators detected”. In case
your phone was successfully installed, check your USB cord/ wire.
Click on OK
Click on Proceed without instant run.
Congratulations your just created your first mobile App
Working with Emulator
In case you don’t have an Android phone to debug your App
with. Android Studio provides with a tool called Emulator you can use.
An emulator looks an Android mobile, it just that you can
touch and feel it. It runs like an Android phone. It is a cool tool. I won’t
really advice it and I am not kicking against either. It makes System hangs
especially systems with low memory.
If you have any issues using it, drop your comments and I
will help you out.


